< Back
User interface buttons

Sculptypaint Tools buttons - Switch between them, to change your current sculpt 3D object in different ways.

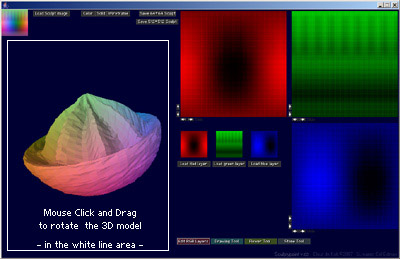
In the top-left
I show the actual 64*64 pixels sculpt image, that generates the 3D model.
Load Sculpt image PNG
---> Major change; In v.093 to load a sculpt image/texture/reference image, drag and drop it onto Sculptypaint
Loads a sculpt image, please use PNG (accepts .png .gif .jpg .gif)
Can crash sometimes on tga files made in photoshop, blender etc! A processing bug. And certain TGA files will render the 3D model inside out.
Undo
An undo-buffer, currently 16 steps back/forward. still needs testing though.
Save 64*64 Sculpt PNG
Saves the current Sculpt image; as 64*64 pixel .png in the sculptypaint folder.
For linux users, it gets saved in users home-directory.
Note: When you upload a sculpt-image in Second life, lossless bug can hurt or deform your sculpted 3D object, so when uploading it in Secondlife, better use the 128*128 image lossless. Or use tools like SLImageUpload that allows lossless image uploads into Second Life.
Save 128*128 Sculpt
Saves the current Sculpt image; as 128*128 pixels .png
Export as 3D .OBJ file
Saves a 3D .obj file, that can be imported in 3D modeling tools like Blender or Wings3D. The .obj file I converted the way SL handles/renders 3D sculpties; sphere/plane/torus/cylinder a 32(33)*32(33) shape. I included the texture layout in the .obj file so you directly use the texturepaint tool from blender to draw your textures onto the model (although I`m not a star in Blender yet)
For the technical Sculptimage details the way they are rendered in SL. (thanks to Aminom Marvin, theBlack box as well):
Textures for sculpties are always like a 32*32 grid layout.
Sphere type: 33*32 model: right side stitches to the left, top and bottom closed to 1 point.
Cylinder type: 33*32 model: right side stitches to the left, top and bottom open.
Plane type: 33*33 model: no stitching
Torus type: 32*32 model: right side stitches to the left, top stitches to the bottom.
If you have like a 64*64 sculptimage, SL will look like at points 0,2,4,6 for the data, only the last row no#63 on the bottom, or no#63 on right side is used when there needs to be a 33 model.
The different type of models 32/33 are used, so alway a 'correct' texture layout for these models will maintain.
Another option to convert a 64*64 sculpt image into a 3D .obj model is using the the Sculpt to .Obj script (Kris Kovacs ©2007) for the Gimp (an opensource 2D paint package). Save it as 64*64 PNG image, load this into the Gimp, then export it as 3D .obj file.

Resize Sculpt
Resizes the sculpt to smaller or bigger proportions again, some little distortion can happen due the calculation errors.
Converts the 3D model from floating point numbers to (SL-sculptimage) RGB data. (from 0-255)
Render:
This will not influence your model at all, just the way it gets drawn on the screen.
- 64*64 - sculptypaint
- 32*32 - (almost) like Second Life does
- 16*16 - second life when Zooming out.
Render Modes
- Color - rainbow sculpt texture
- Solid - white texture
- Wire - Wireframe, handy for working on the inside of hollow vases or like a torus
- Texture - Texturemapped
(To load another Texture Image; drag and drop it onto sculptypaint; use .PNG)
Type
Since secondlife version 1.17+ new types have been introduced
- Sphere - Default when scupties were introduced.
-- Top and Bottom gets stiched to 1 point.
-- Left gets stiched to Right side.
- Torus
-- Top gets stiched to Bottom side.
-- Left gets stiched to Right side.
- Plane
-- No stiching at all
- Cylinder
-- Left gets stiched to Right side.
Grid
Turn on / off the red green and blue lines.
Lamp
Turn on / off the openGL lamp.
Ref.Im
Turn on / off the Reference Image
To load another (square) Reference Image; drag and drop it onto sculptypaint; use png (with alpha) or gif.
< Back